CPR Basics guide hero image showing hands-only CPR chest compressions being performed.

CPR Basics: A Step-by-Step Guide to Hands-Only & Full CPR

If you learned CPR more than a few years ago — or you're picturing the "ABCs" from a health class poster — the steps have changed. Current guidelines don't start with checking breathing anymore. They start with compressions, immediately, because that's what actually keeps blood moving to the brain.

This guide walks through CPR the way it's actually taught today: hands-only CPR for untrained bystanders, the full compression-airway-breathing sequence for trained rescuers, how an AED fits in, and what's different for kids and infants. None of this replaces a hands-on certification class — but it's exactly what to know before, during, or instead of one, and what to have on hand so you're not searching for supplies during the four minutes that matter most.

Quick Answer: How to Perform CPR

  • Check and call: check responsiveness, call 911, and get an AED if available.
  • Compressions: push hard and fast, 100 to 120 per minute, at least 2 inches deep.
  • Airway and breathing: 2 breaths after every 30 compressions if trained; otherwise stick to hands-only CPR.
  • Using an AED: turn it on, follow the voice prompts, and resume compressions right after any shock.

Full step-by-step guide is below.

Why CPR Basics Matter Right Now

In 2025, bystanders performed CPR in 42.5% of cardiac arrest cases — the highest rate since 2016, but still less than half. That gap matters: people who receive bystander CPR survive to hospital discharge at roughly 10-12%, compared to 2-8% for those who don't. Every minute that passes without CPR or defibrillation lowers the odds of survival by another 7-10%.

Most cardiac arrests happen at home. That means the person doing CPR is usually a spouse, a parent, or a friend — not a stranger, and not a paramedic. Brain damage can begin after about four minutes without oxygen, which is often faster than help can arrive. Knowing the current steps, and acting on them immediately, is what actually changes the outcome.

Need CPR Supplies?

We help offices, schools, and teams stock the right supplies and stay compliant.

Request a Quote

The 3 Steps of CPR: C-A-B, Not A-B-C

CPR used to be taught as Airway-Breathing-Circulation — check the airway and give breaths before starting compressions. That sequence was changed industry-wide back in 2010 because the delay before the first compression was costing lives. Today it's Compressions-Airway-Breathing: start pushing on the chest first, immediately, before anything else.

1. Check & call. Check responsiveness — tap the person's shoulder and shout. If they don't respond and aren't breathing normally, call 911 (or point at a specific person and tell them to call) and get an AED if one is available. Don't wait to start compressions until help is on the phone.

2. Compressions. Push hard and fast in the center of the chest, at a rate of 100 to 120 compressions per minute. Compress at least 2 inches deep but not more than 2.4 inches for most adults, and let the chest fully recoil between pushes. Minimize any pause in compressions — every interruption lets blood flow drop back off.

3. Airway & breathing (trained rescuers). If you're trained and willing, open the airway with a head-tilt/chin-lift and give 2 breaths after every 30 compressions (a 30:2 ratio) using a CPR mask or face shield if one is available. If you're not trained or not comfortable giving breaths, skip straight to hands-only CPR below — it's still highly effective and it's what's recommended for most bystanders.

Using an AED

An AED (automated external defibrillator) walks you through the process out loud — you don't need training to use one correctly. Turn it on as soon as it's available and follow the voice prompts. Apply the pads to bare, dry skin exactly as shown in the diagram on the pads. Stand clear while it analyzes the heart rhythm and during any shock. Resume compressions immediately afterward, whether or not a shock was delivered, until paramedics take over.

Hands-Only vs. Full CPR: Which Should You Use?

Hands-only CPR is the current recommendation for untrained bystanders responding to an adult who suddenly collapses. It's continuous chest compressions with no rescue breaths — nothing to pause for, nothing to remember beyond push hard, push fast, don't stop. Studies show it's just as effective as full CPR in the first several minutes after cardiac arrest, and bystanders are more likely to actually start it because there's no hesitation about giving breaths to a stranger.

Full CPR (30:2) is recommended if you're trained and confident, or in situations where the cardiac arrest was caused by a breathing problem rather than a heart problem — drowning, choking, drug overdose, or cardiac arrest in an infant or child. In those cases, rescue breaths address the actual cause, not just the symptom.

Shop CPR-Ready Supplies

CPR for Children & Infants: What's Different

The core idea is the same, but the technique changes for smaller bodies. If you regularly care for kids, a pediatric-specific CPR class is worth taking separately — but here's the high-level difference:

  • Children (age 1 to puberty): Same compression rate as adults (100-120/min). Depth is about 2 inches, or roughly one-third the depth of the chest. Ratio is 30:2 for a single rescuer, 15:2 if two rescuers are trained and present.
  • Infants (under 1 year): Use two fingers, or both thumbs with hands encircling the chest, instead of the heel of your hand. Depth is about 1.5 inches, or roughly one-third the chest depth. Same 30:2 / 15:2 ratios apply.

Because infant and child cardiac events are more often caused by a breathing problem than a heart problem, rescue breaths matter more here than they do for a sudden adult collapse — hands-only CPR is not the first choice for kids.

Do You Need to Get Certified?

This guide is not a substitute for hands-on training. Compression depth, hand placement, and airway positioning are hard to get right from reading alone, and a certification class is the only way to practice them on a manikin with feedback. If you're heading into a class soon, use this as a preview of what you'll cover — not a replacement for it.

Online-only courses are flexible and cheaper, but most workplaces, schools, and youth sports leagues require the hands-on skills session that comes with in-person or blended certification. Certification is typically valid for two years before a refresher is required.

People who commonly need current CPR certification include teachers and childcare workers, lifeguards, youth sports coaches (often a state or league requirement), fitness instructors, and employees in many workplace safety roles. The American Red Cross and American Heart Association both offer classes nationwide.

What Should Be in Your Kit

Knowing the steps doesn't help much if there's no CPR mask, AED, or trauma supplies within reach when something happens. This is the part most CPR guides skip — being ready to act, not just knowing how.

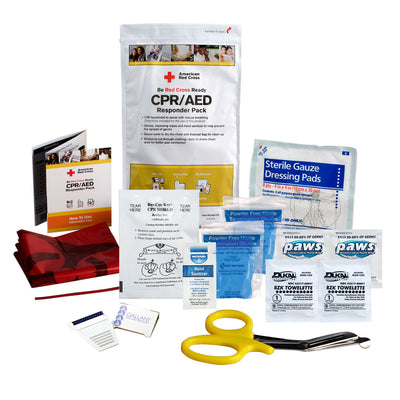
For workplaces, offices, and schools, ANSI/OSHA guidance calls for a stocked first aid station with bleeding-control and airway supplies, not just adhesive bandages — and CPR readiness works best when supplies aren't limited to one central kit. Our CPR Response Bundle gives you 25 individual CPR packs to spread across classrooms, offices, and team stations, so a face shield and gloves are always within reach, not locked in a supply closet down the hall.

Browse our full First Aid Kits collection to find the right level of coverage for your home, vehicle, workplace, or team.

The Steps Are Simple. Being Ready Is the Part People Skip.

CPR itself is straightforward once you know the current steps: compressions first, hard and fast, minimize interruptions, use an AED the moment one's available. What actually determines whether someone gets help in time is whether a bystander knows those steps and has the right supplies within reach. Get certified if you haven't, and make sure the kit is where you'd actually need it — not just somewhere in the building.

Frequently Asked Questions

What are the 3 steps of CPR?
Check responsiveness and call 911, then start chest compressions (Compressions), open the airway (Airway), and give rescue breaths if trained (Breathing) -- C-A-B, not the older A-B-C order.
Is it CPR ABC or CAB?
It's C-A-B. The sequence changed industry-wide in 2010 so rescuers start compressions immediately instead of delaying for airway and breathing checks first.
What's the correct CPR compression rate and depth?
100 to 120 compressions per minute, at least 2 inches deep but not more than 2.4 inches for most adults, allowing the chest to fully recoil between compressions.
What is hands-only CPR and when should I use it?
Hands-only CPR is continuous chest compressions with no rescue breaths. It's recommended for untrained bystanders responding to an adult who suddenly collapses, and it's just as effective as full CPR in the first several minutes.
Do I need a face shield or mask to perform CPR?
No -- hands-only CPR doesn't require one. If you're giving rescue breaths, a CPR face shield or mask is recommended to protect both you and the person you're helping, and many first aid kits include one.
How is CPR different for children and infants?
Depth and hand position change. For children, compress about 2 inches using one or two hands; for infants, use two fingers or two thumbs and compress about 1.5 inches. Rescue breaths matter more for kids since breathing problems are the more common cause.
How long does a CPR certification last?
CPR certification is typically valid for two years before a refresher course is required.
Does my workplace need to have an AED or CPR supplies on hand?
OSHA doesn't universally mandate CPR training or AEDs, but many states, industries, and insurers do, and ANSI/ISEA Z308.1 guidance calls for stocked first aid stations with airway and bleeding-control supplies. Check your state and industry requirements directly.